This is one of my husband's favorite lunches. About 5 or so years ago, Jason tried an Arby's chicken salad sandwich for the first time, and he was hooked! Fruit and chicken mixed together for me sounded disgusting. I started making it for him, with chicken, celery, Miracle Whip and grapes. It probably took me two years of making it to actually try it for myself, but it was without Miracle Whip because in my opinion, mayonnaise should not be sweet, my husband begs to differ. Ha Ha. Since trying it I was able to tweak and perfect the recipe, into what is now one of my husband's favorites.
What you will need:
1 Granny Smith Apple
I package of Craisins
1 stalk of Celery
Roughly 1 cup of Mayonnaise (I used Best Foods or Hellmans)
2 Fully Cooked Chicken Breasts (shredded)
or (if you're in a hurry)
2 cans of Chicken (or Chicken of the Sea if you want Tuna Salad)
Chop about a half of a stalk of celery, and throw it into a medium sized bowl. Cut up the apple into thin chunks, small enough to eat in a sandwich, but bigger than the celery. Add your fully cooked chicken, or in my case this time I used canned.. I know, I know. But I didn't have much time to make it, and it's actually quite good, if you splurge for a name brand. I start of with a few scoops of mayonnaise, start stirring and use my own judgement on adding more. You want the salad to be coated but not drowning in mayonnaise. And that's all there is to it. I like to use lettuce and a croissant with my salad, or sometimes just lettuce!
Oh, and this recipe serves quite a few people, probably 3 people could have two sandwiches, but it does last a few days covered in the refrigerator.
I have been super busy lately. I have been out of town, and of course trying play catch once I got back. Anyway, no new creations yet this week, but an idea that's been floating around in my head for a year or so now. Cyber Sabbath.. I am not proud to admit this but I used to be a Real Housewives of... fan and on one of the shows a housewife mentioned Cyber Sabbath, and I thought it was such a great idea. Just one day a week, no internet. Shut your computer down on Saturday at sundown and turn it back on Sunday at sundown. Yes, this sounds scary to me too, and of course if it's absolutely necessary you can break the rule once or twice. But, I'm sure like many of you, I have 5 or more books that I have bought wanting to read soooo bad, and have never read a single page. I have so many projects I want to work on, places I want to visit (just in my city, let alone the world), photographs I've been meaning to take, and this gives me that opportunity without and distraction. So I have started a facebook page, in hopes that we can all share our experiences together, as we do the things we've been meaning to do! Join us, even if you're not fully committed, it doesn't hurt to try!
Let me start off by saying it's a great feeling having internet again! Our provider had some sort of issue, and we we're without internet for 4 days. Which isn't too bad, but it made me realize how much I rely on the internet.
Anyway, I found some light switch covers at the Habitat for Humanity Restore, as I had mentioned in my DIY Comic Coasters post, for only .10 cents. There's so many different crafty things you can do with light switch covers, but I wanted to try my husband's spray paint art. I love how they turned out, and it was really very simple.
Start with a clean light switch plate. Spray on a base coat, for the example I am showing my base coat is black. Probably the easiest way to learn how to paint like this is to refer to our video posted in a previous blog; A Quick Look at Spray Paint Art. After letting the base coat dry, start planning out your planets, if you want them in the corner, in the middle. Plan your colors as well, and also it's important to find household objects to protect the planets as you paint around them. In this one, I used a small soup can, and two spray paint caps.
Spray paint in a round shape, in the area you would like your planets, take a sheet of newspaper, wax paper, aluminium foil, or magazine page to place on top of the wet starting of the planet. Here's is an example, I used a magazine page. I folded it, pressed it down and peeled it off, when you are satisfied with your planet colors and pattern, place the household item on top of it. Repeat the same, for other planets.
Once you're done with the planets, it should look something like this:
Spray the base coat color on again, around the household items.
Let the paint dry a few minutes, and then take a can of white paint, and spray in on the side of each can, cap or whatever you are using to cover the planet, this creates a white ring effect. Here's an example:
You can leave it like that, or you can spray some paint on your index finger (with rubber gloves on) and flick in onto the light switch to create stars. Slowly remove the the caps, and there you have it!
Here it is, without the messy background, followed by the other one I made.
This is such a great idea to display photos. I have so many framed photos all over the house, it's so hard to make room for new ones, or decide which photo to replace with a new one. This idea, it's easy to replace the photo at anytime. Just curve the photo and place it in the jar upside down, and there ya go, instant picture "frame"!
I got my jar at a thrift store for only .50 cents! I'm hoping to find more at that price in different sizes to add to this one.
I was at the Habitat of Humanity Restore the other day, and found some great tiles for only .10 cents each. They also had light switch covers for .10 cents each as well, and I have a project in mind for those, but that's for a different day. I got two white tiles, and two ocean blue tiles. Let me tell you just a little bit about myself, I am one of those people that do not commit to something unless I'm absolutely sure of it. I do the whole pros and cons list (in my head or written down depending on the scenario) and ask people their opinions. Lets just say I am not a huge risk taker. Anyway, I have not decided what to do with the ocean blue tiles yet, but I knew with the white tiles I wanted to do a Sunday comics theme. I found this comic online, and because my entire family growing up loved Opus, I just knew this one was perfect.
The tiles I have are 4.25 x 4.25 and as you can tell this comic is not a perfect square, so I printed it out at a 3.5 x 4.25.
After gaging the size of the comic vs. the size of the tile, I determined how closely to cut the border. Once I cut it to the exact size I wanted it I used my Homemade Mod Podge. I painted it onto the surface of the clean tile, and then stuck the comic onto the area I wanted it. Make sure to smooth out any air bubbles and creases at this time. I let it dry, while smoothly out some bubbles that appeared while drying.
Now that the tile was dry, I painted the Mod Podge on the tile again. Make sure to paint it all in the direction, so that there are no zig zags, or jagged strokes on the tile. I let it dry and did another coat of Mod Podge.
After letting the second coat dry, I went outside and sprayed a clear coat of spray paint on it, for an added shine, and to protect the comic a little bit more. Here's the finished product, and I will be sure to share my other tiles once I have decided what to decoupage on them!
This is a super cute, easy way to liven up your yard or planter. I found two long skinny rocks to use as the bottom, and two round "mushroom top" shaped rocks for the top. You can paint these mushrooms any color, red, green, yellow, purple, really any color would be cute. I used about three coats on the top rock before painting the spots, and two on the bottom. I hot glued the rocks together, and there ya go little mushrooms!
Yesterday I was itchin' to do some painting. I kept looking at the random polka albums I have and decided I would paint it. I knew from there I wanted to melt it into something, but figured I would decide what to melt it into after painting it.
To do this I used about 7 different colors, I used one color at a time adding random sized polka dots in various sections of the album. Here's an example:
I then applied my Homemade Mod Podge (which I truly love!) to the top of the record. This painting process took me about an hour. You can apply as many or as little as you want of the polka dots.
After the homemade mod podge dried, I put in in the oven at 150 degrees. I placed a upside down metal bowl in the oven and then place the record on top of it. I let it melt for about 30 minutes occasionally checking on it. Once it was easily pliable, I took the record out (using oven mits) and folded the edges in the create a tip at the bottom. I then folded the top over just a little bit just to expose more of the polka dots. If the record starts to harden and it's still not what you want, it's no problem just put it back in the oven for a little bit so that it becomes pliable again. You can do this as many times as you want until you're happy with the results.
Once I was happy with my results, I took a thumb tack and stuck in onto the wall through the hole in the record. I'm going to use mine as a wall pocket, because my husband is always unloading his pockets onto miscellaneous surfaces around our house, so I'm hoping this will work out better for him.
He also had the idea of buying those small battery powered white lights you buy to put on a wreath, and stick them in there to create a sconce. Either way I'm very happy with the results, and the new addition to our wall.
I found an old album at a thrift store for .50 cents, since I use albums for multiple projects, and I liked the album cover it was a pretty good score! I will post the photos below, after explaining what I did. I cut out the part of the album cover I liked, using scissors for the big cuts and an X-acto knife for the smaller cuts. I then took the back side of the album cover and painted it with acrylic paint. Then I used my Homemade Mod Podge, painted it on the back album cover, laid the cut out down and used the Homemade Mod Podge on top of the cut out. I know it still needs something else, and I have a few ideas, but until I'm certain as to what will make it a "finished product" I'm just going to keep it like this. I think it turned out rather well, and I already have an empty easel to display it on.
I have been trying to figure out and master Applebee's 3 Cheese Chicken Penne recipe (or close to it anyway). I have looked at recipes for all sorts of penne. After a few tweaks and a few attempts, I think I've finally figured it out. I made it last night for dinner and it was awesome!
Three Cheese Chicken Penne
2 chicken breasts
1/3cupItalian salad dressing
3 cupspenne pasta
15 ouncesalfredo sauce
8 ouncesItalian cheese , shredded (Mozzarella, Parmesan, Provolone) (I was low on mozzarella so I used some Mexican Style shredded cheese, and it worked well!)
4 tomatoes
1 teaspoonbasil
2 -3 garlic cloves
6 tablespoonsolive oil
Chop the chicken and marinade in Italian dressing for at least 30 minutes
Chop tomatoes, and add in a bowl with the oil, garlic and basil to make bruschetta. Set aside.
Boil penne until cooked.
Grill or broil the chicken. (I've grilled and George Foreman grilled them)
Drain water, then pour the alfredo sauce on top of the penne. (I normally heat up the sauce in a separate pan and add a little garlic to mine, but I love garlic!)
Layer on the bruschetta.
Add the layer of chicken.
Top it with the cheese. (Put a lid on the pot to let the cheese melt a bit or serve it on individual bowls and microwave it)
I have been wanting to make Homemade Mod Podge, for a while now, and I finally did! It is so simple, no mess and works great. I made 8 oz for my first trial run. That would normally be $5-$8 in the store, but I only paid $2.
Here's how you do it:
Homemade Mod Podge
Fill jar half way up with white glue (I used a 4oz bottle of Elmers)
Then fill the jar with the same amount of water as you did the glue.
Shake Well.
This is a 50/50 mixture of glue andwater.
If you would like a Glossy finish, add 1 Tablespoon of clear varnish.
I tried it out today, not for any particular project and it works great. I truly recommend making this at home and saving money by doing so!
Today was a craft catastrophe kind of day. You see it's my friends birthday, and she is an extremely crafty and creative gal. I got it into my head that if I gave her a store bought card it would be as if I was giving a painter and store bought painting from Target or something. I have made handmade cards before, so I went into it expecting good results. Boy was I wrong! My original plan was to make a card out of wax paper. I had seen a how to make wrapping paper out of wax paper on another blog, and thought that might be a cool idea for a card. I cut 3 rectangles out of card stock, one for the front, one that would say "Happy Birthday" and the last would be to write on. I burned the edges of each of these rectangles, and "white washed" them with gold paint to create a old look. I then glued them onto the wax paper, as I didn't want the moving around. I think my biggest mistake is that I had already folded the card and put cardboard in between the fold instead of keeping it flat until finished. My iron was warmed up, and had a towel over the card, ironed until it "fused" together, and then flipped sides. From here I'm not sure what went wrong, but it looked like something I would have made when I was a child. It wasn't smooth, it had tons of creases, and parts of it would not "fuse" together no matter how long I had the iron on it.
I then decided I would take a greeting card I had at home, and paint over the original cover. Not having planned anything, I started with a green base coat, which did not look girlie enough, so I added some yellow to make it more playful. This made me see the beginnings of a tree, so I carried on and painted a tree.
After I finished with the tree, I wasn't happy with the card. It's probably because my original idea didn't pan out. Plus the cover was starting to warp from the paint, so I scrapped that one too.
I then took my 3 rectangles I originally made for the wax paper card, and made this card:
I know that it needs something else, but I'm just not sure what that something is. All in all, I'm happier with it than I was with the other two attempts, and I'm glad that my craft catastrophes (for today) have come to an end. It's funny that some days the sky is the limit for crafting, and other days the simplest of tasks feel impossible.
Thanks for stopping by, and feel free to comment and follow me.
My Husband, as I have said before has been learning the art of spray paint. He was kind enough to allow me to film him during one of his latest projects. It's pretty simple to make, especially after a few practice runs. We've given them as gifts to a few people, and everyone really loves them. We already have a collection of spray paints, but if you're just starting out or would like to try it 5 different colors is a good start. You will definitely need black and white, the rest is up to your own imagination.
In a previous post I went over the basics on how to make a stencil for spray paint art. Click here see the How To on stencil making. Also credit goes to Brandon McConnell whose DVD's have taught Jason several techniques as well has Step by Step directions for each painting in his videos.
I was born, and raised in Chico, California. A city in Northern California, roughly 2 hours above Sacramento. It's a nice city to grow up in, big enough to have most things available, but still small enough to know your neighbor. It's kind of funny, because although it's grown in population and has much more businesses than when I was a child, I most likely could still do a six degrees of separation on each person who lives here. I think it's just one of those cities that will never be big enough to not run into someone you are trying to avoid. Haha.
My Mother is who I give all my credit to for my crafty side. She is incredibly creative, and taught me early on that the sky is the limit, anything I put my mind to is possible. Because of her I can spend hours upon hours in Michaels dreaming of all the possibilities. And you know, even now that I am in my late 20's, she is still teaching me how to create things I had not even thought of. Including these earrings I recently made. I have never attempted jewelry before, not bad for my first try!
Apologies for the lower quality photo. Blasted cell phone camera, it's just so much easier to use when just taking one simple photo!
Anyway, I met my husband July of 2001. I was working for an office supply company, and he was the security guard for the parking lot in the back of our store, which was actually a parking lot for a bank. He would try talking to me, and I didn't really give him the time of day because most of the security guards would just talk my ears off, and I only had short breaks to pay the meter, eat lunch etc. So what does Jason (my husband) do? He pretends his car battery is dead, in order for me to take the time and help him jump start it. We became friends at that point, chit chatting during my breaks, but never anything more than during the time we both worked. He was transferred in August to do security for another business, and I thought that was the end of him. In late August I found a note on my car (in the same parking lot) with his number on it, telling me he'd like to get together sometime, and here was his number. I called a few days later, and we arranged to meet September 2nd for coffee.
After our first date, I knew he was special. We married on September 27, 2008. Yes seven years later. I am a child from a divorced family, and it was actually me that took longer to be ready to get married. I knew I wanted to be with Jason forever, but the binding contract of a marriage scared me. Now that we've been married over three years, I can't remember my life not being married to him. He's a great husband, and also very crafty! He gets extra points for that! Haha.
In 2004, my Mom started her own company. The company I had been working for had gone out of business, so I immediately started working for her. Jason had a job at that time, but he helped out part time doing whatever he could to help Mom's business succeed. In 2006 the business was thriving, so much so that we moved our location to a much larger office space, and Jason moved positions to our company. The same year my Grandfather (from my Mom's side) passed away, and a year later Mom's husband unexpectedly passed away. Huge bumps in the road, obviously, but Jason and I held down fort while Mom took sometime to heal. In 2009, a few employees working for us took advantage of my Mom's kindness. This plus the economy going down the tubes resulted in us having to close our doors. This meant that Mom, Jason and I were all out of a job. My Grandmother (on my Mom's side) health worsened so Mom is now taking care of her full time. Jason also is now working after a year of being unemployed, and I have had some temporary and odd jobs since then, but nothing stable.
I started this blog as mainly something to do. As many people who are unemployed, or stay at home know sometimes its good to have a purpose, something to be accountable for or to have goals for each day. This blog has already helped me in that it's pushed me to do some projects I've wanted to try, but never have done so. Thanks for reading, and please feel free to follow me, I can use all the followers I can get. :)
I know it's not yet blackberry season, but I would like to share my blackberry cobbler recipe. I've made this cobbler for years, and it's a definite favorite around here.
Approx. 2 1/2 to 3 c. blackberries or other berries
1 c. Bisquick or self-rising flour
1 c. sugar
1 c. quick oatmeal
3/4 stick butter
Wash berries and put in saucepan. Add about 1 cup of water or enough to cover. Bring to boil. Pour into
pyrex dish.
Mix dry ingredients. Sprinkle over top of berries. Slice butter thinly and cover top of mixture. Bake at 350
degrees until brown, which for me was about 35 minutes.
So I am sure many of you have seen the DIY Braided Hex Nut Bracelet floating around on Pinterest or other blogs in general. I decided to try it out. I went to Osh Supply Hardware to pick up the twine and hex nuts, I probably should have gone to a bigger store, but Osh is not across town, like Home Depot and Lowes are. I found the hex nuts, and the smallest size they had looked bigger than the ones in the instructions, so I decided just to purchase the pack of 10 instead of the specified 18. Then I get to the twine section, and everything was either too big or too small. This should have been my clue, to just wait until I needed to go to one of the bigger home improvement stores, but I settled on a thinner twine, and decided I would just use more strands of it.
Here's the supplies I started with:
Once I was home and ready to take on this project, my husband took notice and wondered if I could make one for him. He has a job of delivering medicine to patients at their home. Most of them are regular patients, but there have been times that he's delivered to new patients that aren't particularly nice. There have also been a few occasions where employees in the same field have been robbed, so he thought I could make him one in case he is ever in need of some protection. Now of course neither of us are violent people, nor do we want to harm anyone, but this bracelet may be a quick way for him to defend himself and get out of the situation. Beings that I wasn't completely fond of the materials I brought home I figured why not make it for him instead. I cut the twine much longer than I would for me, and long enough to wrap around his wrist twice.
Here's an example I used 3 strands of twine for each strand of the braid, which in total was 9 strands of twine. Oh and yes, that's my cat Desi in the background. He likes to watch but never helps! Haha..
I took a rubber band and put it around my big toe, and slip knotted the twine onto the rubber band. After that I started braiding it about half way then incorporated the hex nuts with each outer strand as I braided. Let me tell you, this looked so much easier than it was. It made think about which strand I was braiding instead of just braiding from memory.
Here is my finished product. In the long run, I should have bought more hex nuts, and definitely the next time I try this they need to be smaller, because the hex nuts flop around and switch positions from being so heavy.
All in all I am happy with how it turned out, and it fits my husbands wrist, so that's a definite plus!
To check out the actual instructions to this bracelet you can go to Honestly...WTF
I was looking for a fairly easy dessert to make for a family gathering. I love the concept of baking, but I am not the best at it. I stumbled upon a recipe for Saltine Toffee. I had all the ingredients except the chocolate chips, which are of course easily obtainable. I went to the store, got some peanut butter and chocolate swirl chips, instead of just the regular chocolate. I am one of those crazy people that do not love chocolate, so I figured with the chips being half chocolate, half peanut butter it wouldn't be overboard in the chocolate department. I know, I know I'm weird ;). This recipe was so easy, and so good, I have since then made a few more batches to pass out with the recipe just to share it with friends and family. Here is the recipe I used courtesy of Mommy's Kitchen:
Saltine Toffee Candy aka Cracker Candy
1 1/2 - sleeves saltine crackers
1 1/4 - cups butter, not margarine
1 1/4 - cup light brown sugar
1 - 12 oz package chocolate chips or
1 - 8 oz package milk chocolate toffee bits
1 - cup chopped nuts (pecans, walnuts or almonds)
Preheat oven to 400 degrees. Line a rimmed baking sheet with foil. Lay crackers out on sheet in one layer. In a medium sized saucepan melt the butter and the brown sugar. Stir often and bring to a full rolling boil. After the mixture comes to a full rolling boil set your timer and boil the mixture for exactly 3 minutes.
Pour over the saltines and bake for 5 minutes. Remove from oven and sprinkle with chocolate chips and wait until they are almost melted then spread the chocolate evenly all over all the saltines. Sprinkle on the nuts all over the top as evenly as possible. Refrigerate for two hours and then break up into pieces and store in a air tight container.
I'm fairly new to Pinterest, well I was invited roughly 6 months ago, but only recently have I started using it. Now I'm hooked and love seeing all the crafts and clever ideas everyone posts! Follow Me. :)
I initially started this craft for a Christmas gift. Every year, I try to not go overboard and spend too much money on Christmas gifts, especially when it's hard to know if the gift will be useful to the receiver. I came across a box of really old, odd records. These records were of polka music, and other music that no one I knew would be interested in. I decided it might be kind of cool, to spray paint bands that people do love. My husband is really good at spray paint art, he can paint space art, and does really well with stencils. After watching him for a few years, I felt like I have enough knowledge to try using spray paint on my own.
Here's my "How To" on spray painting an album.
Items Needed:
Atleast 2 different colors of spray paint. (preferably a light color and a dark color)
A record
A stencil
8 1/2 x 11 (or slightly bigger is fine) poster board or card stock
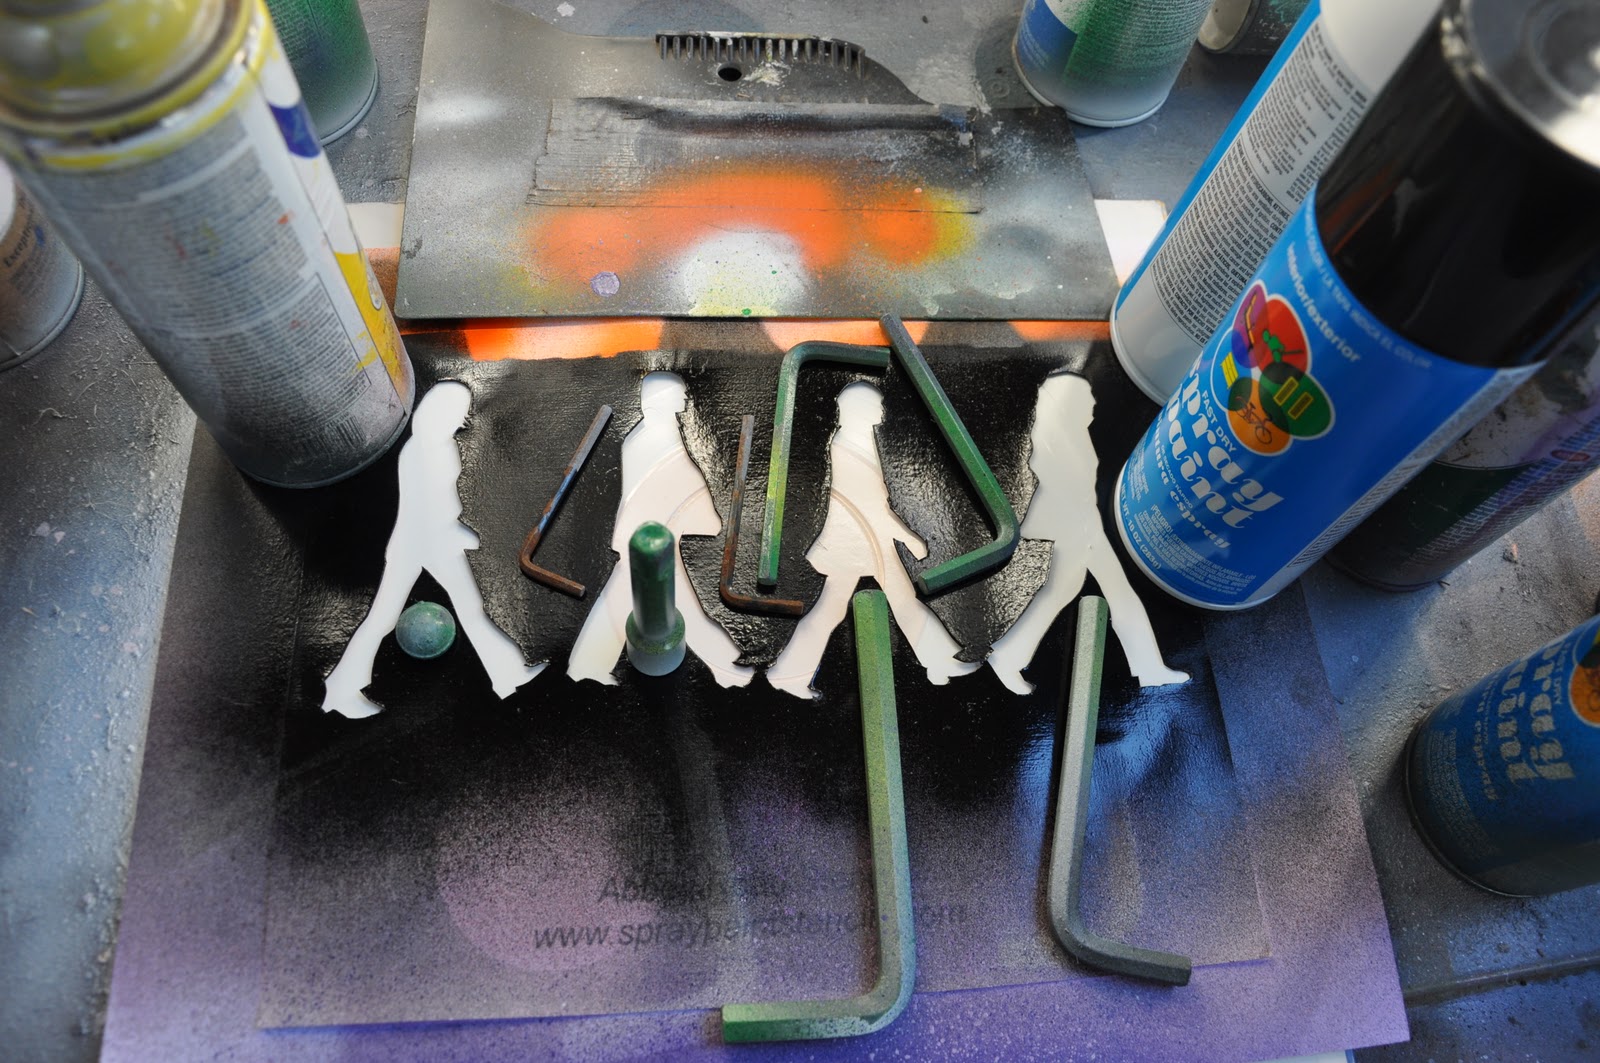
Anything you can use to weigh down the stencil. (I used old allen wrenches)
Spray adhesive to spray the stencil to the poster board
X-acto knife
Cutting board
Step 2: Print and Prep Your Stencil
Print out your stencil to fit an 8 1/2 x 11 sheet of paper. Take the stencil and gently coat the back of it with spray adhesive. Then quickly coat your poster board or cardstock, lay the printed stencil centered, and smooth it down with your palm, so that there is no bubbles or areas unglued. Let it dry for about 10 minutes. After it's dry, put it on top of a cutting board, and using an x-acto knife firmly cut out the pieces. It's always best to start with the smaller pieces, because once the bigger pieces are cut out your stencil will not be as strong. Just a friendly reminder, that I have had to learn the hard way. When you're looking at the stencil and there are pieces you need to keep from being cut out, but do not attach to anything, draw some lines in to attach it to another part.
Here's an example:
In this stencil I cut out the black portion, but you can see if I cut it according to this, there would be a "floating" face. so instead I drew two lines (kind of like those tabs that paper doll dresses with have on them) down his jaw bone to connect the face back to the background, and it worked out perfectly. If only I had taken a photo of this finished album!
Here is an example of a finished stencil. Mine has been used a few times, which explains the paint on it.
Step 3: Prep Your Record
For this Abbey Road record, I decided to paint the record white. When painting a record black it takes less time because really you only need to paint over the label.
First coat never takes very well. Just spray the paint of evenly, and let it dry for about 5 minutes.
The second coat takes much better, but still can see through it a bit. Spray on the second coat evenly and let dry for about 10 minutes.
Third coat just kind of fixes any little bubbles, and little see through parts of the record. On the third coat I also circle around the label a few more times than the other two coats, just to try and hide the color a tiny bit more. I like the label to show a little bit of color to make it look more "record like". The third coat should dry for at least 30 minutes. If you need to add more coats, just make sure the final coat gets at least 30 minutes of dry time.
Step 4: Placing the Stencil
First choose the area your want the stencil to painted on. For this one I wanted it centered. I placed a small piece of poster board on the exposed part of the record, because you do not want a misted line from where your stencil ended.
Next I used allen wrenches and other cans of spray paint to weigh down the stencil, especially in the area between their legs. There have been many times I haven't weighed down a stencil and end up having to re-do it because it bled and smudged too much.
Now that everything is weighed down, it's time to paint! I chose purple, because this is a gift for one of my Sister's friends, and her favorite color is purple. I have also done a white album with The Beatles in black, and I have done a blue album with The Beatles in white. The choice of colors is truly up to your imagination.
Below is a photo of the first coat I painted on with the stencil, below that is a short video showing my spray painting technique. It's worked the best to cover the stencil, without overfilling it and causing it to bleed.
After you're done spraying, slowly take away your weights and cans without causing the stencil to move. Once it's just the stencil and the record, take both hands and quickly lift the stencil up and off. The record will need to dry for about 30 minutes. You can spray a clear coat on it afterwards, but you will still need to wait for it to dry first before doing so.
Here's a few more examples of records I did. I apologize for the quality on some of them, I took it with my cell phone camera.


