
I initially started this craft for a Christmas gift. Every year, I try to not go overboard and spend too much money on Christmas gifts, especially when it's hard to know if the gift will be useful to the receiver. I came across a box of really old, odd records. These records were of polka music, and other music that no one I knew would be interested in. I decided it might be kind of cool, to spray paint bands that people do love. My husband is really good at spray paint art, he can paint space art, and does really well with stencils. After watching him for a few years, I felt like I have enough knowledge to try using spray paint on my own.
Here's my "How To" on spray painting an album.
Items Needed:
Atleast 2 different colors of spray paint. (preferably a light color and a dark color)
A record
A stencil
8 1/2 x 11 (or slightly bigger is fine) poster board or card stock
Anything you can use to weigh down the stencil. (I used old allen wrenches)
Spray adhesive to spray the stencil to the poster board
X-acto knife
Cutting board
Step 1: Find Your Stencil
There are many websites that have free stencils one of the best is http://www.spraypaintstencils.com
I also just decided what I was looking for, searched online under images until I found the right stencil. Here's a link to the Abbey Road stencil http://www.spraypaintstencils.com/a-zlistings/abbey-road-image.gif
Step 2: Print and Prep Your Stencil
Print out your stencil to fit an 8 1/2 x 11 sheet of paper. Take the stencil and gently coat the back of it with spray adhesive. Then quickly coat your poster board or cardstock, lay the printed stencil centered, and smooth it down with your palm, so that there is no bubbles or areas unglued. Let it dry for about 10 minutes. After it's dry, put it on top of a cutting board, and using an x-acto knife firmly cut out the pieces. It's always best to start with the smaller pieces, because once the bigger pieces are cut out your stencil will not be as strong. Just a friendly reminder, that I have had to learn the hard way. When you're looking at the stencil and there are pieces you need to keep from being cut out, but do not attach to anything, draw some lines in to attach it to another part.
Here's an example:

In this stencil I cut out the black portion, but you can see if I cut it according to this, there would be a "floating" face. so instead I drew two lines (kind of like those tabs that paper doll dresses with have on them) down his jaw bone to connect the face back to the background, and it worked out perfectly. If only I had taken a photo of this finished album!
Here is an example of a finished stencil. Mine has been used a few times, which explains the paint on it.

Step 3: Prep Your Record
For this Abbey Road record, I decided to paint the record white. When painting a record black it takes less time because really you only need to paint over the label.
First coat never takes very well. Just spray the paint of evenly, and let it dry for about 5 minutes.

The second coat takes much better, but still can see through it a bit. Spray on the second coat evenly and let dry for about 10 minutes.

Third coat just kind of fixes any little bubbles, and little see through parts of the record. On the third coat I also circle around the label a few more times than the other two coats, just to try and hide the color a tiny bit more. I like the label to show a little bit of color to make it look more "record like". The third coat should dry for at least 30 minutes. If you need to add more coats, just make sure the final coat gets at least 30 minutes of dry time.

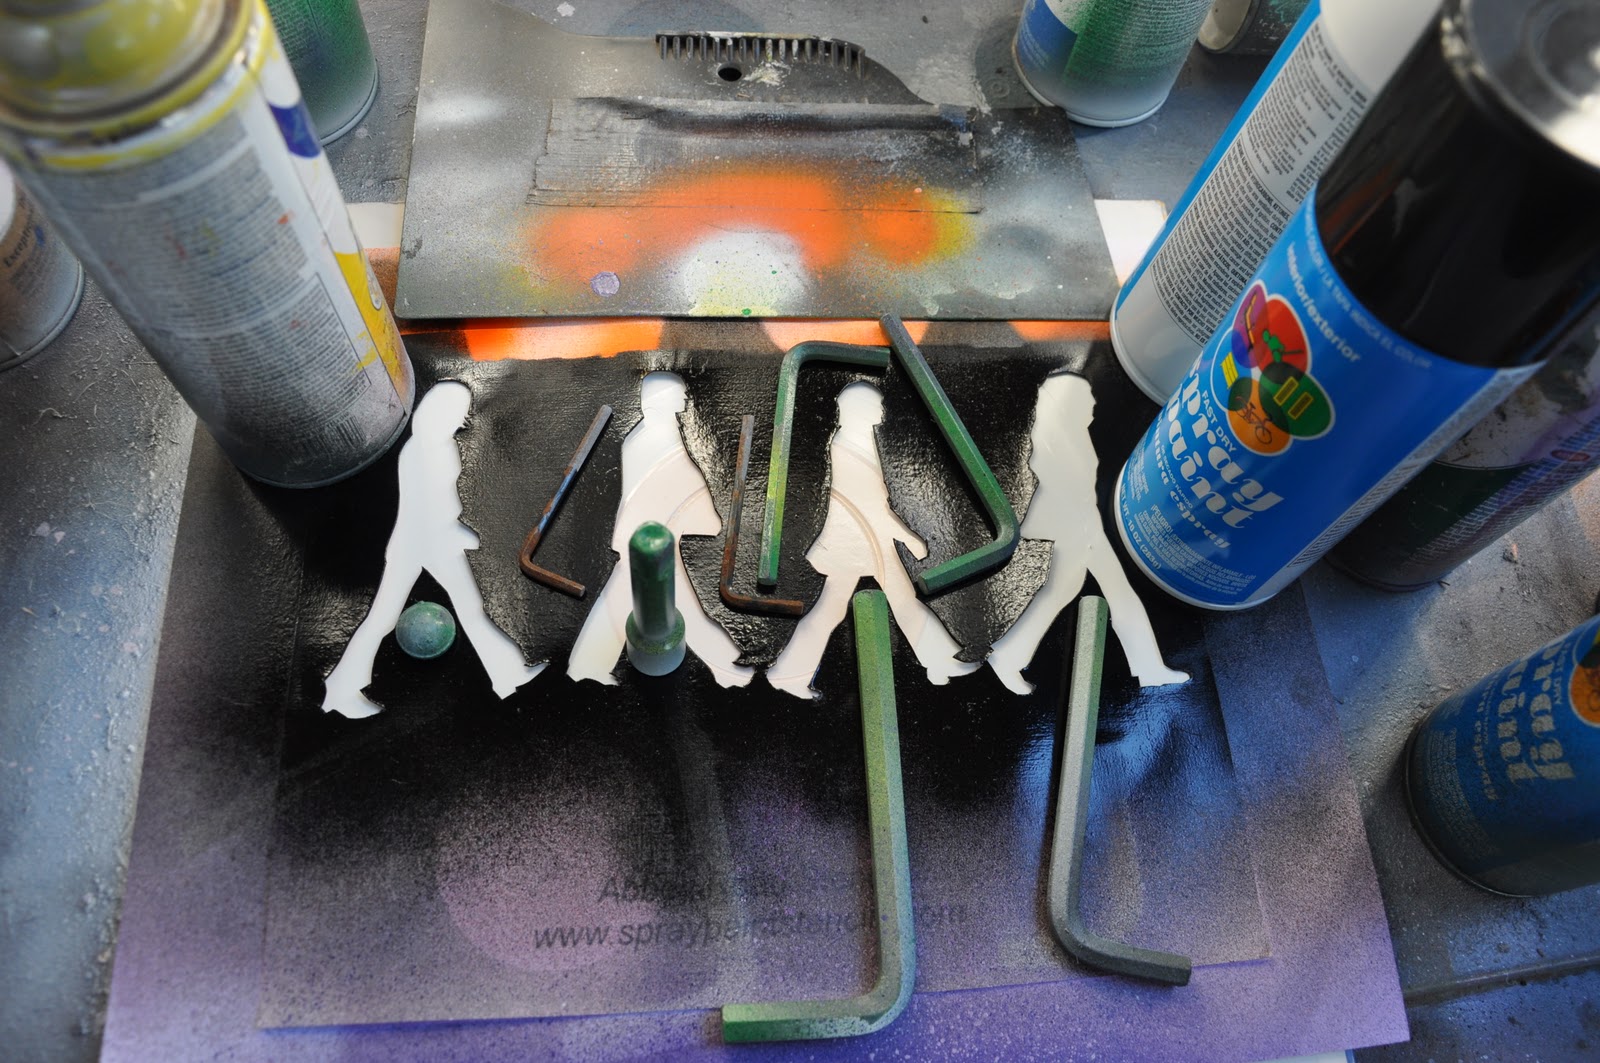
Step 4: Placing the Stencil
First choose the area your want the stencil to painted on. For this one I wanted it centered. I placed a small piece of poster board on the exposed part of the record, because you do not want a misted line from where your stencil ended.

Next I used allen wrenches and other cans of spray paint to weigh down the stencil, especially in the area between their legs. There have been many times I haven't weighed down a stencil and end up having to re-do it because it bled and smudged too much.
Now that everything is weighed down, it's time to paint! I chose purple, because this is a gift for one of my Sister's friends, and her favorite color is purple. I have also done a white album with The Beatles in black, and I have done a blue album with The Beatles in white. The choice of colors is truly up to your imagination.
Below is a photo of the first coat I painted on with the stencil, below that is a short video showing my spray painting technique. It's worked the best to cover the stencil, without overfilling it and causing it to bleed.


After you're done spraying, slowly take away your weights and cans without causing the stencil to move. Once it's just the stencil and the record, take both hands and quickly lift the stencil up and off. The record will need to dry for about 30 minutes. You can spray a clear coat on it afterwards, but you will still need to wait for it to dry first before doing so.
Here's a few more examples of records I did. I apologize for the quality on some of them, I took it with my cell phone camera.


I like the Abbey road stencil...I think I'm going to use it as a cut-out on my cousins b-day cake:)
ReplyDeletewhat kinda of spray paint do you suggest using???
ReplyDelete